Retirado do blog http://keyka.typepad.com/
31 de janeiro de 2012
Cadeira renovada!
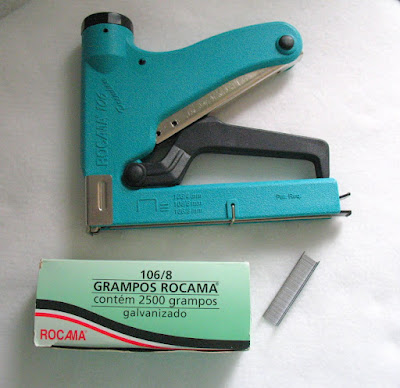
Se você quiser dar uma modificada na sua cadeira com um tecido bem especial também, você vai precisar de algumas ferramentas que não são difíceis de encontrar... Eu comprei o meu grampeador de tapeceiro com os grampos na Kalunga, e são da marca Rocama, tamanho (largura dos grampos) 106, com grampos de tamanho 106/8 - que não são muito altos, mas que funcionaram bem para segurar os tecidos com as camadas internas que eu acrescentei na minha cadeira.
Para essas camadas utilizei mantas acrílicas que uso em meu trabalho normalmente, e uma espuminha de 1 cm de altura que comprei numa casa de materiais para tecelagem em Santo Amaro, e não são difíceis de encontrar, podendo ser substituídas por qualquer material usado para forração de cadeiras, ou até várias camadas de manta acrílica mais grossinha.
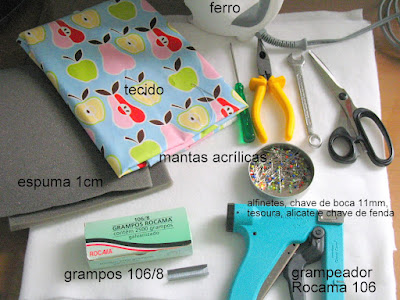
Materiais: Grampeador de tecelagem, grampos, cerca de 1,10 x 1,10 de tecido da sua escolha, mais ou menos 60 x 60 cm de espuma com 1 cm de largura (usei somente no acento), manta acrílica (usei dupla no acento e no encosto), alicate, chave de fenda, chave de boca de 11 mm (verifique como o acento da sua cadeira é preso nela - a minha precisou desta ferramenta), tesoura, alfinetes, ferro de passar, duas mãozinhas extras (usei as da minha mãe)!

1. retirar o plástico que esconde os parafusos do encosto
2. soltar os parafusos do encosto
3. que vai ficar assim
4. tirar os grampos que prendem o acabamento em volta do encosto
5. primeiro forçar para cim com a chave de fenda
6. depois puxar com o alicate
7. vai ficar assim; eu decidi não reutilizar este acabamento que acho feio, então joguei ele no lixo
8. colocar as mantas acrílicas (usei duas camadas) e puxando bem ir grampeando na volta toda
9. cortar o excesso com a tesoura
10. em seguida cortar um pedaço de manta (dupla) para o lado de trás do encosto
11. desse jeitinho
12. e 13. grampear a volta toda
14. cortar o excesso da manta
15. para ficar bonitinho... (me perdoem a redundância do tutorial)!
16. encontrar com uma agulha de crochê grossa os furos da madeira onde se prendiam os parafusos e fazer buraquinhos

17. o forro do encosto está prontinho, agora vamos para o tecido
18. e 19. cortar o tecido com margem de cerca de 6 cm dobrando por cima do encosto
20. pedir que as mãozinhas segurem novamente para grampear, iniciando por um lado reto
21. antes de chegar na diagonal, puxar bem esta parte, prendendo a mesma
22. em seguida prender com preguinhas bem distribuídas o restante do tecido
23. e 24. cortar o excesso de tecido e manta
25. cortar um pedaço menor do tecido para a parte de trás do encosto, passando ele no lugar com ferro para vincar uma margem onde será cortado
26. arrumar bem o tecido sobre a base e alfinetar
27. costurar à mão com pontinhos invisíveis por toda a volta
28. este processo poderia ter sido diferente se optássemos por guardar o acabamento original da cadeira, mas acho que ficou mais legal assim - além do que com o acréscimo de volume das mantas o acabamento não daria conta de dar a volta inteira como originalmente ele dava...
29. retirar o acento
30. com a chave de boca, guardando os parafusos, cráro!, para mais tarde
31. retirar toda a volta de grampos do acabamento do acento
32. ele vai ficar assim

33. colocar o acento com o lado arredondado sobre a espuminha
34. atravessando alfinetes para segurar a espuma no lugar certo
35. em seguida recortar o excesso da espuma, rente com o final da curva
36. colocar a manta acrílica (dupla) por baixo de tudo
37. preparar o grampeador
38. retirar os alfinetes, mantendo tudo na posição certinha
39. colocar o tecido por baixo, cortando com uma margem de uns 7 a 8 cm
40. chamar as mãozinhas de volta para puxarem beeem a manta, e por cima o tecido, e começar a grampear
41. fazer mini preguinhas, distribuindo bem sobre o acento, tomando o cuidado de evitar criar pregas nas laterias do acento
42. grampear as diagonais e em seguida o pedaço intermediário entre elas, sempre puxando bem
43. vai ficar mais ou menos assim
44. aí é só cortar o excesso de tecido e manta
45. nesta hora se eu tivesse um pedaço de tnt, teria usado para cobrir - mas como nínguem vai ver esta parte de baixo da cadeira, isso pode esperar um pouquinho mais...
46. tudo bonitinho do lado de cima
47. agora me preocupei com esta parte de junção entre o acento e o encosto, por isso decidi fazer uma tripinha de tecido para cobrir isso, depois de limpar bem os pés e a estrutura da cadeira
48. usei um tecido de malha azul claro que estava por aí, deixando os dois lados em cima e em
baixo, abertos para enfiar sobre o suporte do acento (como a malha é elástica, foi tranquilo fazer isso)...

49. então foi só colocar a tripinha de tecido, recolocar o acento...
50. achar os furinhos do encosto com uma agulha de crochê, prender o encosto
51. e 53. (ops, cadê o 52?) e tudo pronto!

Não ficou uma fofura?!
Ainda nesta semana vou começar a pintar meu ateliê, olha só a foto do antes, já com a cadeira "nova" (a parede está numa corzinha lavanda, meio deprê, que eu quero dar uma esquentada) e umas correções de massa corrida que estão aí há uns três ou quatro meses esperando eu ter o tempo de continuar a pintura:

29 de janeiro de 2012
Bolsinha de festa - tutorial
I'm very excited to be posting over here at the Moda Bake Shop, it's been awhile. I'm so in love with this fabric by Bonnie and Camille, I couldn't wait to get my hands on it. Come visit me over at my blog for a chance to win some of this super cute fabric for yourself! Our Cozy Nest

3 Fat Eighths (or 3 - 9" x 22" pieces of coordinating fabric)
1/2 yard of fast to fuse fusible interfacing or a similar stiff interfacing
Pattern Pieces - included in Printer Friendly Version at bottom of post.

Step One: Pick three of your favorite coordinating pieces from your fat eighth bundle. Not easy to do since they are all so dang cute!
Step two: Decide which piece of fabric you want to use for the body of your bag. Iron it onto the fusible interfacing.
Step three: Cut out pattern pieces, trace onto fabric, and cut out. You will need to cut two purse pieces. The pattern for the sides and bottom of the purse will need to be traced and then flipped over and traced again on the other side since the fabric will be too stiff to fold.
Here is what you should have:
Step 4 - Do the same thing in step three for the lining of the bag. Note - Be sure and layout your pattern pieces so you have that extra fabric on the right side. This piece of fabric will be used for the "binding" at the top of the purse. You will need to make sure there is 1 1/4" of extra fabric on the right side.
Step 5 - Lay one of the purse pattern pieces down with print side up. Lay your piece for the sides and bottom on top of it with the print side down (like in picture below). Starting on the right side, begin sewing the two together, making sure to back stitch at the beginning and end. Note: Use 1/4" seam allowance on the entire project unless noted otherwise. I'm not much of a pinner and honestly this fabric is going to be so stiff, I'm not sure you could pin it.
I just sew a little at a time, sort of curving the sidepiece to the fabric piece as you go. I kept my needle down when I lifted up the presser foot to move the fabric.
Step 6 - Now sew the other side of the purse on starting on the right side again. Don't worry too much about having to bend and move the fabric, I just used an iron when I was finished to smooth it out.
When you're done sewing the body of the bag together, trim the edges of the bag down to about 1/8".
Follow steps 5 and 6 for the lining of the bag. Turn your bag (not the lining) right side out and place the lining inside so that wrong sides are together. Stitch the two together by sewing around the top of your bag using a 1/4" (or a little less) seam allowance. It's embarrassing that it took me a while to figure this out, but it's much easier to do this if you remove the extension table from your machine (that blue plate you see on mine).
Step 7 - Make the ruffle for the top of the purse. Out of you third coordinating piece of fabric, cut a strip of fabric that measures 2 1/2" wide by 22" long. Iron the fabric in half with the print on the outside. If the raw edges on the end of the ruffle bother you, just fold it over 1/4" before ironing it in half lengthwise and stitch. To make the ruffle I just sew along the length of the fabric (raw edges on the inside) and about every 3/4" make a pleat by folding the fabric up about 1/4" inch and then back down again. The picture below shows it much better than I can explain it. When you are done making the ruffle, sew it to the top of your bag. Finished off the edges by overlapping the two ends about 1/2".
Step 8 - Making the bag handle. Cut a piece of fabric that is approximately 2" x 11" out of the same fabric as your ruffle. Iron the strip of fabric in half, unfold and then iron the outside edges into the center like pictured below. Iron back in half (should be 1/2" wide) and stitch 1/8" in on both sides.
Step 9 - Pin handle to purse like pictured below and tack into place.
Step 10 - Binding around top of bag. I apologize for this very poor picture, I couldn't get my flash to work. I did this the same way I would bind a quilt. This is where you will use that little 1 1/4" wide piece of fabric that you saved from the lining. You will need to sew the two pieces together end to end, it should be about 16" inches long although you wont need nearly that much. Iron fabric in half lengthwise and then unfold and iron one side into the center (just like you did for the handle, but only one side).
Sew onto the top of your bag by placing the side of the binding that is not folded onto the top of your bag with print side down. Fold the very edge of the binding over about 1/4" to give the edge a finished look. Sew around entire opening of bag and when you get to the end, overlap the pieces 1/2" to 1" folding the very end over 1/4" before stitching down. Now the fun part (at least to me). Fold binding over onto the inside of bag an hand stitch down. If your bag is wrinkly when you're done, take a hand towel and wrap it around your hand. Put your wrapped hand inside of the bag and apply a warm iron to outside of bag until you are happy with how it looks.

One super cute party bag, for your little princess!
Nicole Willmore
26 de janeiro de 2012
25 de janeiro de 2012
Assinar:
Comentários (Atom)


